261 Broad Street
Windsor, CT 06095
(860) 285-0172
support@invisiblegold.com
Your Website Should Be Easy to Edit
Windsor, CT 06095
(860) 285-0172
support@invisiblegold.com
Your Website Should Be Easy to Edit
Users and Groups
|

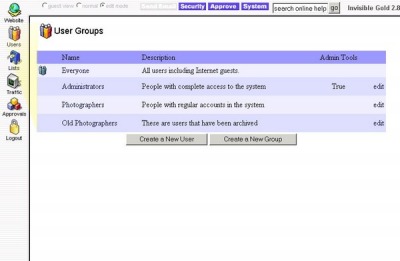
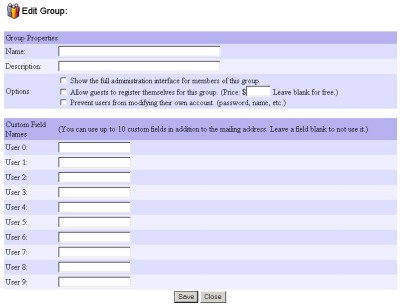
Creating a New Group
Note: This is the same page you'll see if you choose a Group and click Edit. At first it seems that there is alot of information to enter. In reality, all you need to start with is a Name and a Description. Keep in mind that if you later enable Open Registration, website visitors will see the text you type here. Options: "Show the full administration interface for members of this group." determines whether the members see the buttons along the top and left of the page when they log in (the buttons you see as an Administrator). You might want to turn this off if you are creating a group for members that only have the right to add to a discussion list, or perhaps customers that can only access a private page. "Allow guests to register themselves for this group." works with the Registration system to allow visitors to create accounts in this Group. Be careful as you can accidentally expose a big security risk by turning this on for a group that has Administrative rights. The Advanced Commerce license adds the ability to set a price for registering for a Group. If you set it to 0, it will be Free. You can also have several Groups that have different prices. "Prevent users from modifying their own account." can be used if you want to create a User account for multiple people and don't want them to be able to make changes. Otherwise, it's nice to let people update their own address and password. Custom Fields: The last section allows you to name custom fields associated with this group of users. It's a good idea to leave these blank unless you are creating custom templates that use them. (in which case they are accessed with USER0, USER1, etc.) |
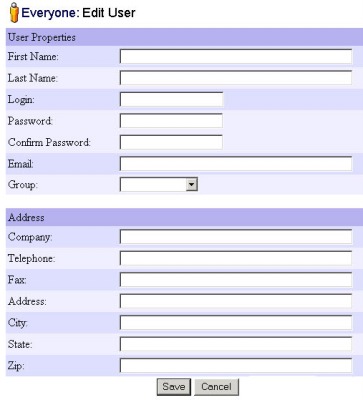
Creating a User
Next, simply fill in the information for the User. Name is simply their name. Login is the ID they will need to type in to log in. Password will need to be typed in twice (to confirm) and it will appear as a string of circles (to hide what you type in). It's a good idea to also include an Email Address for new Users. This will allow them to send a Password Reminder to themselves if they forget their password. Note: There is no way to send a Password Reminder if someone forgets their Login. It is very important to choose a Group for the new User. Keep in mind that they will have the rights granted to that Group. (For example, making someone an Administrator will allow them to make changes to the entire site.) You can also enter the User's address. If the User uses the shopping cart (after logging in), this information will be displayed automatically. It will also be updated if they enter a different Billing Address while using the shopping cart. Note: User Logins are unique. If it turns out the login you are trying to use has already been taken, you will have the option to go back and change it. When you are done, click Save. |
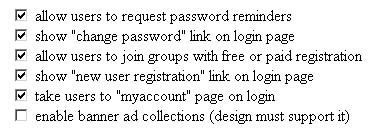
System Settings That Effect Open and Paid Registration
The first two options enable or disable the Password Reminder and Change Password links in the Login page. The third option "allow users to join groups with free or paid registration" enables or disables the Registration page. Without this, Users cannot create their own accounts. (It's a good idea to keep this turned off if you don't need it.) Note: The first time you turn this on, a special "/Register" page will be created. The fourth option shows or hides a link to the registration page on the login page (if it is enabled). This is interesting because you can have a website with open registration but not publicly show the link. This can add a slight level of security useful in a classroom setting, for example. Last, when Users log in with the "myaccount" feature turned on, they will go to a page that allows them to edit their own information. This is very useful if you want to create a custom file called myaccount.htm as a Framework in the defalt Framework directory. Users will be taken to it automatically upon logging in. This is a great place to put orientation and/or welcome information. |
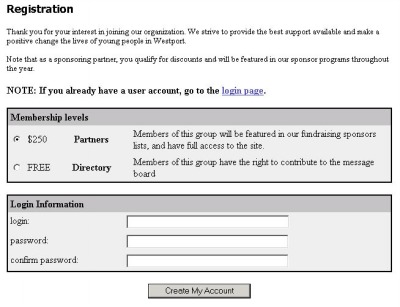
Using the Registration Page
Note: User Logins are unique. If it turns out a Login is already being used, you will have the option to go back and try another. When you click Create My Account, it will automatically create the User account in the proper group. If there is a fee, it will go through the Shopping Cart (by first taking the Billing Address, and then payment details.) |
Import/Export
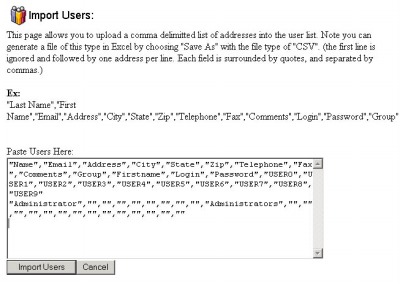
Exporting is quite simple. Go to the User Group you'd like to export and click the export link at the top right. You will then be prompted to save the new CSV file. Importing is quite a bit more involved. The easiest way to do it is by first exporting from the user group (even if it is empty). You can then use a program like Excel to copy/paste your new user accounts right into the proper fields. (The order of the columns is very important so don't change them.) Next, save your file as a CSV format. Go to a User Group (any will work), and click the import link in the top right. At this point you'll need to open up the CSV file in a text editor such as Notepad (you can click Start | Run and type notepad.exe to make it open.) Copy and Paste the text into the Import field and click upload. Note: If you have trouble, try removing ampersand (&), doublequote ("), and extra carriage return characters from your CSV file. This is easy to do in Excel using Edit | Replace. |
See Also:
| Online Documentation Home, Invisible Gold Quick Tour, Template Library, Users and Groups, Shopping Cart, Mailing Lists, Uploading Images, Traffic, Approvals, Banner Ads, Login/Logout, Email Newsletters, Advanced Button, Moving Pages, System View, Security, System Settings, Hosting Invisible Gold Powered Websites, Generate a PayPal Client ID, Terms, Useful HTML Guide, Private Client Areas |
Keywords:
| Users, Groups, Registration, Shopping Cart, Templates, Licenses |
Invisible Gold, LLC was founded in 2001 as a web design and internet software company. The owner, John Waiveris, wanted to enable people to manage their own websites. John is active in the Windsor community and the Invisible Gold website software is used daily by 600 businesses.
Latest News
- Website Performance TestingTwo tools for testing website speed
- Meta Tags vs. Keywords: Your Site's Visibility
- Don't Get Tricked By "Domain Registry of America"The Domain Registry of America has recently sent out a countless number of letters and emails in a campaign to get you to switch to their domain registry service by using language that suggests that your domain will expire, and that in order to prevent losing it, you must register with their company. The email is disingenuous at best and fraud at its worst.
Contact Us
Windsor, CT 06095
(860) 285-0172
support@invisiblegold.com
Your Website Should Be Easy to Edit
2026 © All Rights Reserved. Terms of Service