261 Broad Street
Windsor, CT 06095
(860) 285-0172
support@invisiblegold.com
Your Website Should Be Easy to Edit
Windsor, CT 06095
(860) 285-0172
support@invisiblegold.com
Your Website Should Be Easy to Edit
Taking Better Photos For Your Website
This is especially true for an online store. A potential customer will first judge whether they can trust you with their money. Then, they will decide whether to buy anything you sell. Even if you have exactly what they want, they still might not know it. They can't touch or feel the product; so you need convey the experience through words and images. Further, you need to grab their attention quickly as there are lots of other sites they can click to next. This article includes some tips and introduces three professional techniques that you can use with a digital camera and items you have around the house. |
Disclaimer
Introduction and Work flow
Basic - Choose A Suitable Background
Medium - Use A Shadow Box For An Art Gallery Look
Advanced - Use A "Tent" To Control Reflections
Conclusion
DisclaimerIt's a good idea to hire a professional photographer and writer to create your first online catalog. It is an expense that will probably pay for itself many times over. At least start with good photography. Make an honest assessment of your skills and equipment, then determine whether your time and money are better spent selling products or learning a new hobby. Regardless, give us a call or email if you are unsure or want some help.
|
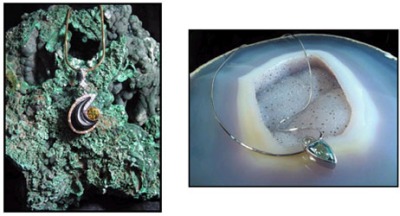
Basic - Choose A Suitable BackgroundOften the thing that separates a good photo from a bad one (other than focus and exposure) is the background. Luckily in the studio, this is easy to control. Build up a collection of background fabrics and papers. Wrapping paper is an inexpensive way to get started. You can choose a different color for each product and get creative. Keep in mind that a background color may change the exposure settings. Your camera tries to average a scene out to medium gray. It will make a bright background darker and a dark background lighter. There are a variety of techniques to correct this - it just takes a little trial and error and depends on your photography skills. (For example: many cameras have "exposure compensation", you can use a "gray card", you can "bracket", use "manual mode" etc.)
|
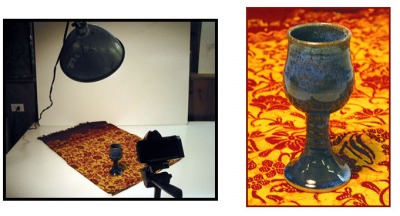
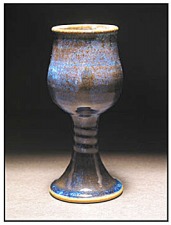
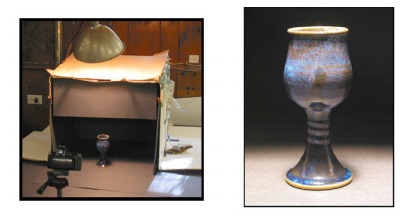
Medium - Use A Shadow Box For An Art Gallery LookA shadow box is really just a simple method of putting your product on a black background. Start out with a big empty box, about 5 sheets of black poster paper, and some clothes pins and tacks. Line the box and cut off one side (like the example). You'll want a single light just in front and above the box. Move the box toward the camera until just before the shadow darkens the product (in this case a clay goblet). You don't need much light - 100 watts should be fine. Another trick is to use a separate piece of paper to cover the top half the box to make it darker inside. The exposure in this case will be 1-2 stops too bright. Also, pay attention to the reflections.
|
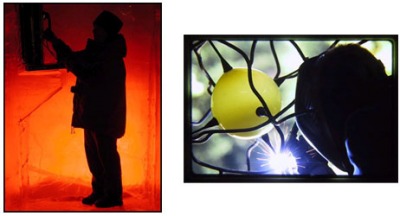
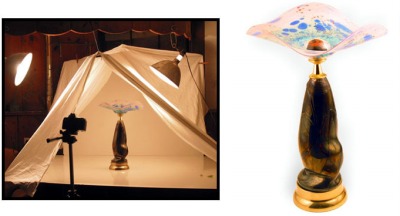
Advanced - Use A "Tent" To Control ReflectionsReflections and transparent objects are the toughest ones to photograph. The dark glass and reflective surface of this lamp make it especially difficult. The trick is to use a tent. This is a technique where you set up the scene inside of a translucent white fabric and light it from the outside. It takes a great deal of wattage (700 watts in this example). However, all of the reflections are just white and you can close the tent right down around the lens so you don't even see the camera. The exposure needs to be a few steps higher. In this example bracketing was used to ensure a balance between capturing the details in the clear pink glass at the top and the reflections in the black glass at the bottom. The tent was left open to give a dark band on the front. A white tent like this is also nice because it leaves almost no shadow and makes it very easy to crop out all of the background. The photo isn't the standard rectangle and you can color the background to match the page.
|
ConclusionOnce you have a system in place, it becomes very quick and easy to produce new photos for your website. The next step is to develop a process for writing descriptions of the products for sale. |
Invisible Gold, LLC was founded in 2001 as a web design and internet software company. The owner, John Waiveris, wanted to enable people to manage their own websites. John is active in the Windsor community and the Invisible Gold website software is used daily by 600 businesses.
Latest News
- Website Performance TestingTwo tools for testing website speed
- Meta Tags vs. Keywords: Your Site's Visibility
- Don't Get Tricked By "Domain Registry of America"The Domain Registry of America has recently sent out a countless number of letters and emails in a campaign to get you to switch to their domain registry service by using language that suggests that your domain will expire, and that in order to prevent losing it, you must register with their company. The email is disingenuous at best and fraud at its worst.
Contact Us
Windsor, CT 06095
(860) 285-0172
support@invisiblegold.com
Your Website Should Be Easy to Edit
2026 © All Rights Reserved. Terms of Service