261 Broad Street
Windsor, CT 06095
(860) 285-0172
support@invisiblegold.com
Your Website Should Be Easy to Edit
Windsor, CT 06095
(860) 285-0172
support@invisiblegold.com
Your Website Should Be Easy to Edit
Creating Drop Down Menus
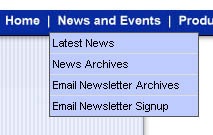
(Note: Drop down menus are a graphical list of links that shows up when you roll your mouse over text (or an image). Look at the top of www.invisiblegold.com for an example.) The only question is how to create them. Unlike other website features, it's not obvious. Drop down menus take no more than 30 minutes to setup when you understand the process. This tutorial will explain the process of using a popular drop down code (courtesy of SmartWebby.com.) Due to its license, we can't distribute the code - however you are welcome to download the code yourself and/or use the last section of the instructions to adapt almost any existing Javascript method for use with Invisible Gold. |
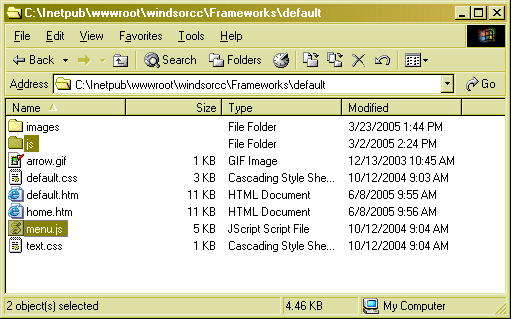
| Step 2 - Copy Files Into Framework Folder To start out, copy an existing folder and copy the javascript menu files into it. Note in our example, the file "menu.js", and several files in a directory called "js" were provided with the downloaded code. You simply copy all of these into your new framework directory.
|
| Step 3 - Edit Your Default.htm file Next, copy and paste the javascript into your framwork file. The Javascript can go right at the end before the </body></html> tags. |
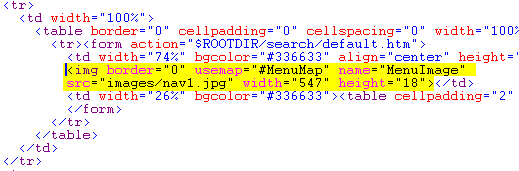
| Step 4 - Create Drop Down Menu Anchor Image The next step is to calculate the pixels at which the drop down menus should start and end (perhaps using "the info" window in Photoshop)(0,0 is in the top left corner on the screen: x is the horizontal axis and y is the vertical). The four values you need for each drop fown location are left x, top y, right x, bottom y. For example: 100, 2, 175, 22. This defines a box that is 75 pixels wide and 20 pixels tall. Notice that the higher y point is a lower number. It might work the other way around, but this is common in computer graphics. Make sure you have a menu map something similar to the following code. Also note the javascript. Each menu will have its own menu to drop down so make sure each line has a different menu function.
|

| Step 5 - Insert GetHTML Call To Generate Menus The last step is to paste and customize the gethtml code. The GetHTML will generate text for each link. The name for each drop down must match the image map code. It also needs to know where to place the menu relative to the image's position on the screen. To do this I usually just use the same "left" point and add a pixel or two to the bottom of the image map. For example, the first drop down menu will look like the example below. Make sure you have one for each menu on the list. This is where you set the color for the drop down menus. You also have to choose what "id" you are pulling the list of pages from. It's now ready to test. If the pages have no children, they should show "**New Page". Otherwise, you will be able to see a list of child pages when you roll your mouse over each menu. If you have the code wrong it will show a javascript error or not show anything at all. You might need to simply create a page for each of the drop down menus at this point so the pages are viewable.
|

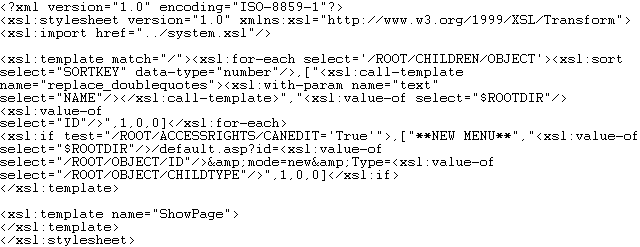
| Step 6 - Create the Custom Template This tutorial is based on an Invisible Gold installed file called dropdownmenu4.xsl which is in the \currentversion\templates\default directory. However, you can follow similar steps for just about any code you find on the internet. The process is similar, but keep in mind that this xsl file is actually generating a snippet of javascript that would've normally been written by hand. (In this case it is just the name of each page surrounded by quotes, a comma, and the link.)
|
| Update - The old code stopped working on FireFox 4.0+ The old menu.js file stopped working. Do two things to fix it: 1) add style="position:relative;" to the table that surrounds the menumap image. 2) replace menu.js (in the framework's folder) with this text: |
See Also:
| Online Documentation Home, Advanced: Using Drop Down Menus With Calendars, New CSS Menus, Overview, Directory Structure, Frameworks, Custom Templates, Web Designer Tip: Customize the Page Title, Creating Drop Down Menus, GetHTML Tags |
Keywords:
| Authoring, Frameworks |
Invisible Gold, LLC was founded in 2001 as a web design and internet software company. The owner, John Waiveris, wanted to enable people to manage their own websites. John is active in the Windsor community and the Invisible Gold website software is used daily by 600 businesses.
Latest News
- Website Performance TestingTwo tools for testing website speed
- Meta Tags vs. Keywords: Your Site's Visibility
- Don't Get Tricked By "Domain Registry of America"The Domain Registry of America has recently sent out a countless number of letters and emails in a campaign to get you to switch to their domain registry service by using language that suggests that your domain will expire, and that in order to prevent losing it, you must register with their company. The email is disingenuous at best and fraud at its worst.
Contact Us
Windsor, CT 06095
(860) 285-0172
support@invisiblegold.com
Your Website Should Be Easy to Edit
2024 © All Rights Reserved. Terms of Service